
Arduino Uno


Written by
Atribot team
Last updated
June 10, 2026
Introduction
Have you ever wondered how robots move, sensors collect data, or smart devices make decisions? At the heart of many electronics and robotics projects is the Arduino Uno. It is one of the most popular microcontroller boards used by students, hobbyists, and engineers worldwide.
The Arduino UNO provides an easy way to interact with sensors, actuators, displays, and communication modules through simple programming. Its beginner-friendly design, open-source ecosystem, and large community support make it an excellent choice for learning electronics and embedded systems.
Whether you want to build a blinking LED circuit, a smart home automation system, a robot, or an IoT project, the Arduino UNO serves as a powerful platform for turning ideas into reality.
In this article, you will learn about the Arduino UNO's main components, pin configuration, technical specifications, working principle, advantages, disadvantages, and real-world applications, giving you a strong foundation for your future electronics projects. 🚀
Main Parts
The Arduino Uno consists of several important components that help it process data, communicate with devices, and power external circuits.
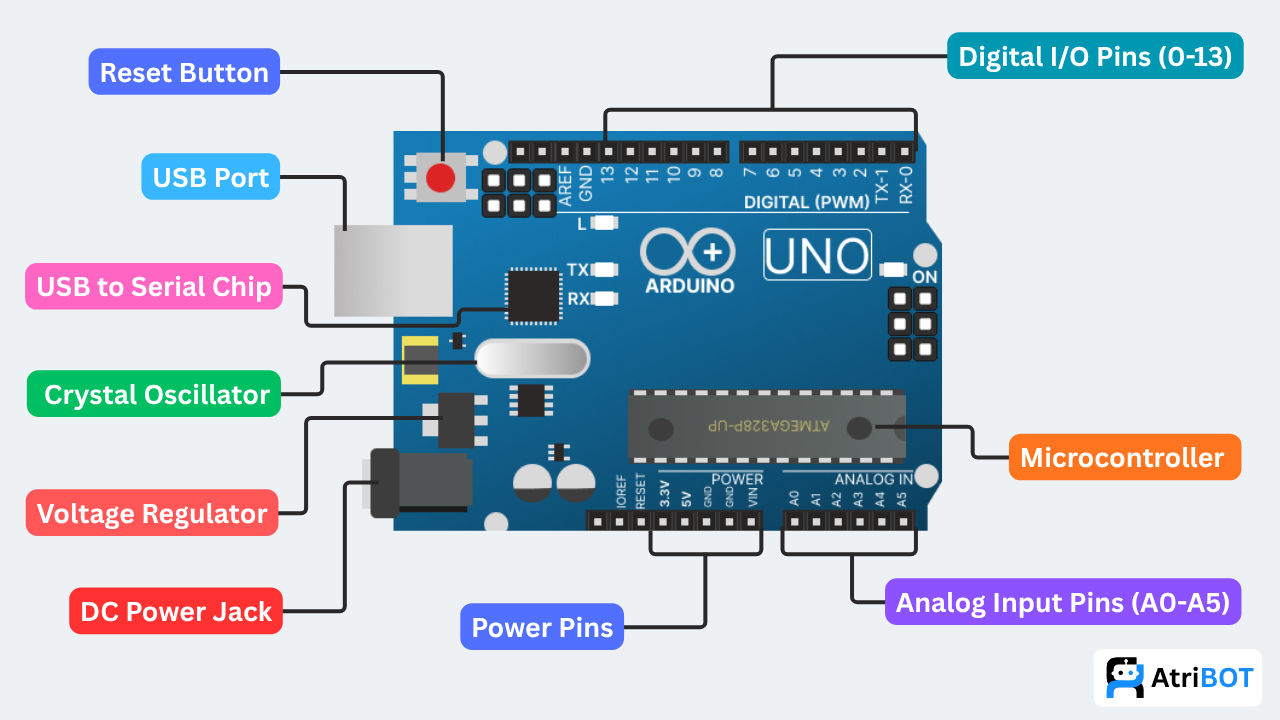
1. Microcontroller (ATmega328P)
The ATmega328P is the main microcontroller on the Arduino UNO. It acts as the brain of the board and executes the uploaded program.
Functions:
Executes Arduino sketches
Processes input and output signals
Controls connected sensors and modules
Stores program instructions
2. Digital I/O Pins (0–13)
The Arduino UNO provides 14 digital input/output pins numbered from 0 to 13.
Functions:
Read digital inputs
Control LEDs, buzzers, and relays
Support PWM output on selected pins (3, 5, 6, 9, 10, 11)
Enable serial communication through pins 0 and 1
3. Analog Input Pins (A0–A5)
The board contains 6 analog input pins labeled A0 to A5.
Functions:
Read analog voltage signals
Interface with analog sensors
Convert analog signals into digital values using the built-in ADC
4. Power Pins
The power header contains pins used to power the Arduino and external devices.
Important Power Pins:
VIN
5V
3.3V
GND
IOREF
Functions:
Supply power to modules and sensors
Provide regulated voltage outputs
Support external power input
5. USB Port
The USB Type-B port connects the Arduino UNO to a computer.
Functions:
Upload Arduino programs
Enable serial communication
Provide power to the board
6. USB-to-Serial Converter Chip
The USB-to-Serial chip converts USB communication into serial communication that the microcontroller can understand.
Functions:
Transfers data between computer and Arduino
Enables sketch uploading
Supports Serial Monitor communication
7. Crystal Oscillator
The Arduino UNO uses a 16 MHz crystal oscillator to generate clock signals.
Functions:
Synchronizes microcontroller operations
Controls instruction execution timing
Provides accurate timing for delays and communication
8. Voltage Regulator
The voltage regulator ensures the board receives a stable operating voltage.
Functions:
Regulates input voltage
Protects the microcontroller
Provides stable power to the circuit
9. DC Power Jack
The DC barrel jack allows external power supplies to be connected.
Functions:
Powers the board without USB
Supports batteries and adapters
Accepts an input voltage of approximately 7V–12V
10. Reset Button
The reset button restarts the microcontroller and runs the uploaded program from the beginning.
Functions:
Restarts the Arduino board
Useful during testing and debugging
Reloads the current sketch
11. TX and RX LEDs
These LEDs indicate serial communication activity.
Functions:
TX LED blinks when transmitting data
RX LED blinks when receiving data
Helps monitor communication status
12. Power LED (ON LED)
The ON LED indicates whether the Arduino UNO is powered.
Functions:
Shows board power status
Helps verify proper power supply
13. ICSP Header
The In-Circuit Serial Programming (ICSP) header is used for direct programming of the microcontroller.
Functions:
Program the ATmega328P directly
Used for bootloader installation
Supports SPI communication
14. AREF Pin
The Analog Reference (AREF) pin provides a reference voltage for analog inputs.
Functions:
Improves analog measurement accuracy
Allows external analog reference voltage
15. GND Pins
Ground pins provide the common reference point for the entire circuit.
Functions:
Complete electrical circuits
Provide common ground connections
Ensure proper operation of connected devices
Together, these components make the Arduino UNO one of the most popular development boards for learning electronics, robotics, automation, and IoT systems.
Pinouts
The Arduino Uno provides three main groups of pins that allow it to communicate with sensors, modules, displays, and other electronic devices.
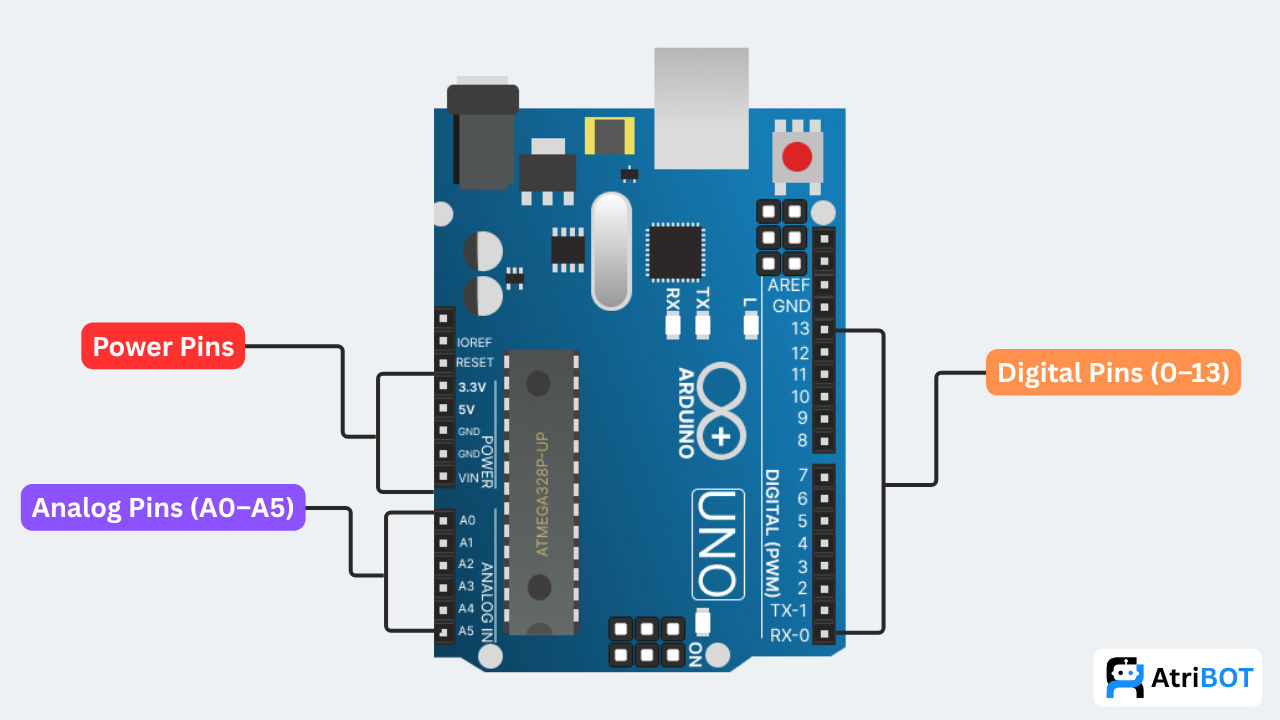
1. Digital Pins (0–13)
The Arduino UNO has 14 digital input/output pins numbered from 0 to 13.
These pins can be configured as either input or output pins using software.
Functions:
Read digital signals from sensors and switches
Control LEDs, buzzers, relays, and motors
Support communication protocols
Special Digital Pins
Pin | Function |
|---|---|
0 (RX) | Serial Receive |
1 (TX) | Serial Transmit |
2, 3 | External Interrupts |
3, 5, 6, 9, 10, 11 | PWM Output |
10, 11, 12, 13 | SPI Communication |
2. Analog Pins (A0–A5)
The Arduino UNO includes 6 analog input pins labeled A0 to A5.
These pins are connected to a built-in 10-bit Analog-to-Digital Converter (ADC).
Functions:
Read analog voltage signals
Interface with analog sensors
Convert analog values into digital data
Commonly Used With:
LDR Sensors
Potentiometers
Gas Sensors
Temperature Sensors
Analog Pin Functions
Pin | Function |
|---|---|
A0–A5 | Analog Input |
A4 | SDA (I2C Data) |
A5 | SCL (I2C Clock) |
3. Power Pins
The power header provides different voltage outputs and power connections.
These pins are used to power external modules and sensors.
Power Pin Details
Pin | Function |
|---|---|
VIN | External Power Input |
5V | Regulated 5V Output |
3.3V | Regulated 3.3V Output |
GND | Ground |
IOREF | Reference Voltage |
RESET | Resets the Microcontroller |
Important Notes
Digital pins operate at 5V logic levels.
Analog pins can measure voltages between 0V and 5V.
PWM pins can generate analog-like output signals using pulse-width modulation.
Pins 0 (RX) and 1 (TX) should be used carefully because they are connected to the USB serial communication interface.
Arduino UNO Pin Summary
Pin Group | Number of Pins | Purpose |
|---|---|---|
Digital Pins | 14 (0–13) | Input/Output Operations |
Analog Pins | 6 (A0–A5) | Analog Signal Reading |
PWM Pins | 6 | Analog-like Output |
Power Pins | 6 | Power Distribution |
Communication Pins | Multiple | UART, SPI, and I2C Communication |
Understanding these pin groups is essential because every Arduino project uses them to connect sensors, actuators, displays, communication modules, and other electronic components.
Specifications
The Arduino Uno is a popular microcontroller board designed for electronics, robotics, and embedded system projects. Its balanced performance and ease of use make it ideal for beginners and professionals alike.
Parameter | Specification |
|---|---|
Microcontroller | ATmega328P |
Operating Voltage | 5V |
Input Voltage (Recommended) | 7V – 12V |
Input Voltage (Limit) | 6V – 20V |
Digital I/O Pins | 14 (6 PWM Pins) |
Analog Input Pins | 6 (A0–A5) |
PWM Pins | 3, 5, 6, 9, 10, 11 |
DC Current per I/O Pin | 20mA |
DC Current for 3.3V Pin | 50mA |
Flash Memory | 32 KB |
SRAM | 2 KB |
EEPROM | 1 KB |
Clock Speed | 16 MHz |
USB Interface | USB Type-B |
Communication Protocols | UART, SPI, I2C |
ADC Resolution | 10-bit |
Operating Temperature | -40°C to 85°C |
Board Dimensions | 68.6 mm × 53.4 mm |
Weight | Approximately 25 g |
Key Features
Based on the ATmega328P microcontroller
14 digital input/output pins
6 analog input pins
Built-in USB programming interface
Supports PWM, UART, SPI, and I2C communication
Operates at a clock speed of 16 MHz
Compatible with a wide range of sensors and modules
Large open-source ecosystem and community support
Easy programming using the Arduino IDE
These specifications make the Arduino UNO suitable for a wide variety of applications, including robotics, home automation, IoT systems, sensor interfacing, and educational electronics projects.
Advantages & Disadvantages
The Arduino Uno is one of the most popular microcontroller boards due to its simplicity, affordability, and extensive community support. However, like any development board, it has both advantages and limitations that should be considered before choosing it for a project.
Advantages
Easy to use and beginner-friendly
Simple programming using Arduino IDE
Large community and documentation support
Open-source hardware and software
Compatible with a wide range of sensors and modules
Affordable and easily available
Supports UART, SPI, and I2C communication
Ideal for learning electronics and robotics
Extensive library support
Excellent for prototyping projects
Disadvantages
Limited processing power
Limited memory capacity
No built-in Wi-Fi connectivity
No built-in Bluetooth support
Limited number of input/output pins
Slower than modern microcontrollers
Requires additional modules for wireless communication
Not suitable for advanced IoT applications
Limited storage for large programs
Less powerful compared to boards like ESP32 and Raspberry Pi Pico
Despite these limitations, the Arduino UNO remains one of the best choices for beginners, students, and hobbyists who want to learn electronics, programming, and embedded systems
Applications
The Arduino Uno is widely used in electronics, robotics, automation, and IoT projects. Its versatility and ease of use make it suitable for both beginners and professionals.
1. Robotics Projects
Arduino UNO is commonly used to control robots, robotic arms, and obstacle avoidance systems.
2. Home Automation Systems
It can automate lights, fans, appliances, and other household devices using sensors and relays.
3. IoT Projects
When combined with Wi-Fi or Bluetooth modules, Arduino UNO can be used in Internet of Things (IoT) applications.
4. Sensor-Based Monitoring Systems
It can collect and process data from various sensors such as temperature, humidity, gas, and motion sensors.
5. Smart Agriculture
Arduino UNO is used in irrigation systems, soil moisture monitoring, and greenhouse automation.
6. Security Systems
It can be used in motion detection alarms, RFID access control, and smart door lock projects.
7. Weather Monitoring Stations
Arduino can monitor environmental conditions using sensors and display the collected data.
8. Educational Projects
Widely used in schools, colleges, and training centers for learning electronics and programming.
9. Industrial Automation
Used for process monitoring, machine control, and automated systems in small-scale industries.
10. Display and User Interface Projects
Arduino UNO can interface with LCDs, OLED displays, keypads, and touch modules to create interactive systems.
11. Communication Systems
Supports communication modules such as Bluetooth, Wi-Fi, RFID, GSM, GPS, and LoRa.
12. DIY Electronics Projects
Used in countless hobby projects including smart dustbins, automatic street lights, line-following robots, and digital clocks.
The Arduino UNO serves as the foundation for thousands of electronics projects, making it one of the most versatile development boards available for learning, prototyping, and innovation.